DIY note
How to Paint a Daisy in Watercolor
People usually fall into one of two camps when painting flowers: those who painstakingly render every tiny petal, and those who focus on capturing the overall character of the bloom. This tutorial is designed for the latter.
River Monroe
Maker
Bench tip
Read the full note below and keep tools nearby.
Shelf
Hobby build
People usually fall into one of two camps when painting flowers: those who painstakingly render every tiny petal, and those who focus on capturing the overall character of the bloom. This tutorial is designed for the latter.
The surprising truth is that a believable daisy often comes from simplifying rather than adding detail. Instead of carefully drawing dozens of petals, you'll begin with a simple oval. Instead of building a rigid background, you'll create soft washes that allow the flower to breathe. By embracing loose brushwork, you'll achieve a result that feels natural and lively.
Materials You'll Need
Cold-pressed watercolor paper, 300 gsm (lighter paper may warp easily)
Watercolor paints: yellow, orange, green, and blue
One round brush (size 6–8) for washes and petals
One fine-detail brush (size 2) for stems and leaves
Container of clean water
Paper towel
HB or 2B pencil
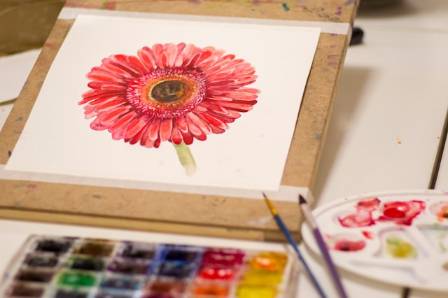
Step 1: Create a Simple Flower Shape
Resist the urge to draw every petal individually. Instead, lightly sketch a single oval that represents the overall silhouette of the flower head.
Think of this oval as a guide for the petal cluster rather than a precise botanical drawing. Keep the pencil lines soft so they won't show through the finished painting.
Step 2: Paint a Soft Background Wash
Using clean water, dampen the area surrounding the flower shape while leaving the oval dry. Introduce a diluted blue or blue-green color into the wet surface and allow it to spread naturally.
The untouched white area will preserve the flower while the surrounding wash creates a gentle atmospheric effect.
At this stage, the painting already begins to feel more refined and expressive.
Step 3: Form the Petals
Many beginners make the mistake of painting petals that are all identical. Real daisies are far more irregular.
Using fluid brushstrokes, paint petals extending outward from the oval shape. Vary their widths, lengths, and spacing. Let some overlap while others separate slightly.
The goal is not perfection but natural variation. Loose strokes create a more convincing flower than overly controlled ones.
Step 4: Suggest Grass Around the Base
When the background is partially dry but still slightly damp, introduce loose green strokes around the lower portion of the flower.
Vary the direction, length, and intensity of these marks to suggest grass. This simple addition helps place the daisy within an environment rather than leaving it suspended against an empty background.
Step 5: Paint the Flower Center
Apply a rich yellow wash to the center of the daisy.
While the paint remains wet, touch in a small amount of orange. The colors will blend together naturally, creating a warm, luminous center.
Allow this area to dry thoroughly before proceeding to the next stage.
Step 6: Add the Stem and Leaves
Mix a fresh green and paint the stem using a single confident stroke.
Add one larger leaf attached to the stem along with a few small leaves beneath the flower head. Keep the shapes simple and direct.
A clean, decisive stroke often appears more convincing than several hesitant ones.
Step 7: Finish and Evaluate
Take a moment to step back and observe the painting from a distance.
You'll notice that the flower feels alive precisely because it isn't overworked. The soft background enhances the white petals, the varied brushwork creates movement, and the glowing center ties the composition together.
Your watercolor daisy is complete.
Why Loose Watercolor Techniques Work So Well
When every petal is carefully controlled, a daisy can end up looking more like a scientific illustration than a living flower. Loose watercolor painting captures the feeling of nature rather than merely its structure.
The soft wet-on-wet background plays a crucial role. It introduces light, atmosphere, and depth without requiring extensive detail. Viewers instinctively understand that the flower exists within a real environment.
Irregular petals also contribute to realism. Natural forms are rarely symmetrical, and our eyes recognize those subtle imperfections as authentic.
Once you understand this process, you'll realize many flowers follow the same basic approach:
Establish a simple overall shape.
Create an atmospheric background.
Paint loose, expressive petals.
Add a focal center.
Finish with stems and foliage.
A sunflower, chamomile, or many other blooms can be approached using the same principles.
Where to Go From Here
By painting a single daisy, you've practiced several foundational watercolor skills:
Wet-on-wet backgrounds
Expressive brushwork
Layering transparent colors
Creating depth through simplicity
Try applying these techniques to other flowers such as roses, poppies, or lavender. Each subject introduces new challenges while relying on the same core concepts.
As your confidence grows, you'll begin noticing flowers differently in everyday life—examining their colors, shapes, and subtle variations. Before long, every garden becomes a source of inspiration and every bloom a potential watercolor study.
Nearby projects
· en
The Tale of the Snake Plant
Maelin Frost

· en
Brown Bears: Characteristics and Differences Across Regions
Nicholas Evans
· en
Ginkgo Tree Overview
Nora Wilder
· en
Succulent Plants: The Perfect Indoor Greenery
Lucien Barrett

· en
The best viewing spot in one of the three cities with the most beautiful night views
Michael Williams

· en
Ten Fascinating Insights Into the Aurora Borealis
Hazel Victoria Dunmore